Cloudy Core
CloudyCore Writeup
Table of Contents
- Introduction
- First Steps
- Step 1: Visual Inspection with Netron
- Step 2: Extracting the Tensors
- Step 3: Analyzing the Output
- Step 4: The Logic (XOR)
- Step 5: Decompression
Introduction
CloudyCore is a medium challenge from HTB University CTF 2025: Tinsel Trouble.
First steps
We start by analyzing the provided file. A quick check reveals it is a tflite file with some data inside it.

A TensorFlow Lite (.tflite) file is officially defined as “a serialized format designed for on-device machine learning optimized for mobile and embedded devices”… and a bunch of other complex words that ChatGPT keeps throwing at me. It’s basically a binary for a neural network. It stores the trained model (the logic) and the weights (the data) in a single file, much like a compiled executable.
Step 1: Visual Inspection with Netron
Since .tflite is a binary format, we can’t just read it with a text editor. The standard first step for any ML challenge is to visualize the graph. I used Netron.
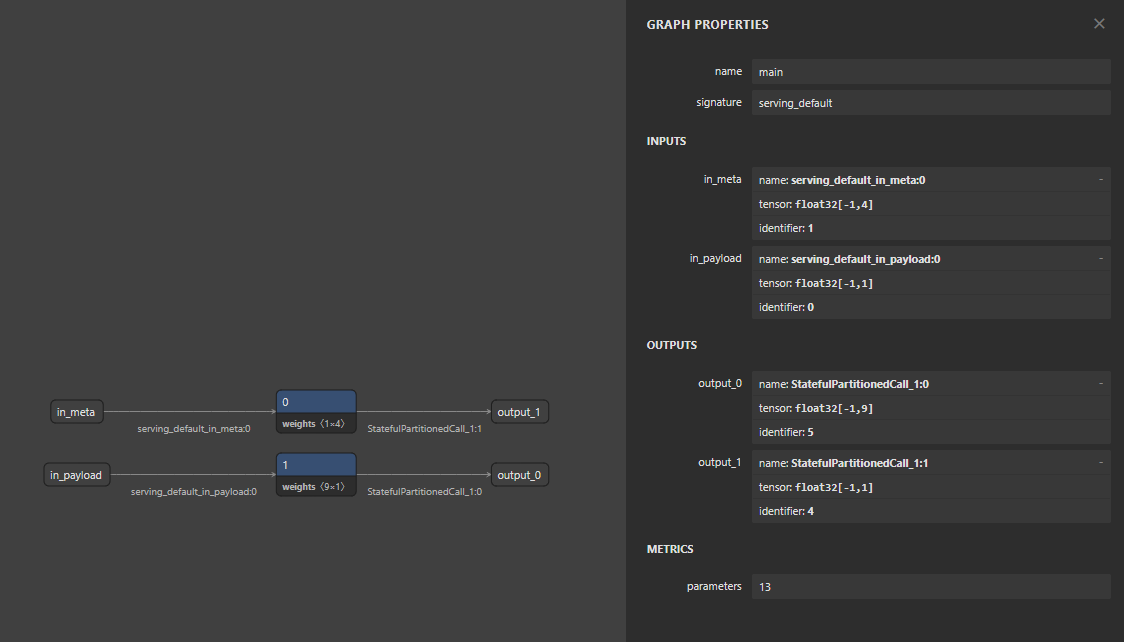
If we look at the graph, we can see only 2 nodes. The graph is split into two small branches, each performing an operation involving constant weights.
- One branch uses a weight tensor of shape
[1, 4]. - The other branch uses a weight tensor of shape
[9, 1].
Step 2: Extracting the Tensors
Now that I knew where to look (tensors with shapes [1, 4] and [9, 1]), a friend of mine (ChatGPT) told me this could be easily done with the tensorflow library. I didn’t want to dig through documentation so I generated a script to iterate through the model and dump the relevant tensors.
1
2
3
4
5
6
7
8
9
10
11
12
13
14
15
16
17
18
19
20
21
22
23
24
25
26
27
28
29
30
import tensorflow as tf
import numpy as np

def solve():
    interpreter = tf.lite.Interpreter(model_path="snownet_stronger.tflite")
    interpreter.allocate_tensors()
    details = interpreter.get_tensor_details()
    candidates = []

    for tensor in details:
        data = interpreter.get_tensor(tensor['index'])
        size = data.size * data.itemsize
        if 10 < size < 100:
            flat_data = data.flatten()
            raw_bytes = data.tobytes()
            candidates.append({
                "name": tensor['name'],
                "index": tensor['index'],
                "bytes": raw_bytes,
                "len": len(raw_bytes)
            })

            print(f"Candidato encontrado:")
            print(f"  Name: {tensor['name']}")
            print(f"  Shape: {tensor['shape']}")
            print(f"  Bytes (hex): {raw_bytes.hex()}")
            print("-" * 30)

if __name__ == "__main__":
    solve()
You need to create a venv and install dependencies
1
2
3
python3 -m venv venv
source venv/bin/activate
pip install tensorflow numpy
Step 3: Analyzing the Output
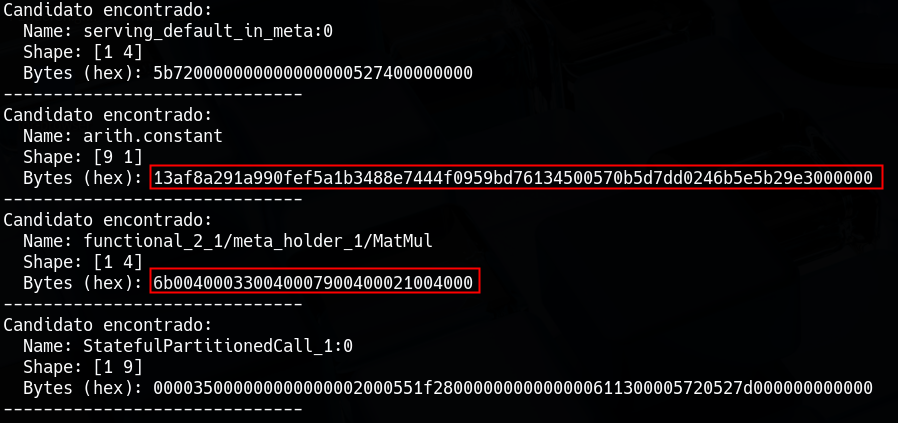
Reviewing the script’s output we can see 4 posible matches, but by checking the values from the file uploaded on netron before, we can focus on
- The
[9, 1]tensor (arith.constant) contained a long, high-entropy string of bytes. - The
[1, 4]tensor (functional...MatMul) contained a pattern of bytes.Step 4: The Logic (XOR)
Why do we care about these bytes? The challenge description gave us the final hint:
“The scoundrel was boasting about hiding the Starshard’s true memory inside this tiny memory core… scrambling the final piece with a simple XOR just for fun.”
To this point, we havent done any XOR, so a valid approach now is to use it on those values.
Because of the weights, we are gonna use “9 to 1” every byte on arith.constant and “1 to 4” which means, for every byte, we skip 4 bytes on functional_2_1/meta_holder_1/MatMul
1
2
3
4
5
6
7
8
9
10
11
12
13
cipher_hex = "13af8a291a990fef5a1b3488e7444f0959bd76134500570b5d7dd0246b5e5b29e3000000"
ciphertext = bytes.fromhex(cipher_hex)

key_hex = "6b337921"
key = bytes.fromhex(key_hex)

decrypted_bytes = bytearray()
print(f"[+] Doing xor with: \n\tCipher -> {ciphertext}\n\tKey -> {key}")
for i in range(len(ciphertext)):
    decrypted_bytes.append(ciphertext[i] ^ key[i % len(key)])

flag = decrypted_bytes.rstrip(b'\x00')
print(f"flag: {flag}")
Step 5: Decompression

The output wasn’t the flag yet. I got a raw byte string: b'x\x9c\xf3...'.
At first this looks like garbage, but after coming back to the bytes, we can see that this are Magic Bytes.
'x': In ASCII,'x'corresponds to hex0x78.\x9c
This sequence stands for thezlib compressionso now we have to decompress the file so we can get the flag.
1
2
3
4
5
6
7
8
9
10
11
12
13
14
15
16
17
import zlib

cipher_hex = "13af8a291a990fef5a1b3488e7444f0959bd76134500570b5d7dd0246b5e5b29e3000000"
ciphertext = bytes.fromhex(cipher_hex)

key_hex = "6b337921"
key = bytes.fromhex(key_hex)

decrypted_bytes = bytearray()
print(f"[+] Doing xor with: \n\tCipher -> {ciphertext}\n\tKey -> {key}")
for i in range(len(ciphertext)):
    decrypted_bytes.append(ciphertext[i] ^ key[i % len(key)])

flag = decrypted_bytes.rstrip(b'\x00')
print(f"flag: {flag}")
flag_1 = zlib.decompress(flag)
print(f"flag: {flag_1.decode()}")

Flag: HTB{Cl0udy_C0r3_R3v3rs3d}